Saturday, October 31, 2009

day 163 - scuffed plexi


i had this idea that i should get a piece of plexiglass and scuff up the edges of it, then shoot through it using the scuffed areas as a sort of a frame for the subject. so that's what i did. this is a three dollar piece of plexiglass from home depot, used the dremel on it a bit, set it up like i would normally, and here's the result.

i'm happy with how it came out for a first attempt.... i experimented with using the colorsplash flash to illuminate it different colors..... there were some interesting results, some good some bad in there. i think next i'm going to try and get it dirty, maybe work some mud and dirt from outside into the outer edges. see how that goes. maybe sandpaper it a bit.

anyways. i like this effect... it's like something most people would do in photoshop, done here in camera. and it looks a lot cooler than what most people do in photoshop.
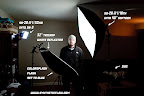
setup shot:

day 162 - bw conversion


i've been playing around with a new way to do a black and white conversion, and i wanted to experiment with it a bit here. did this all in lightroom.... first i switched it to grayscale, then adjusted the color sliders to get the best image. then i applied a split toning to the image, so that only the shadow areas got a bit of warm brown tones.

came out well.

setup shot:

day 161 - tubb


thought the bathroom had some interesting converging lines in the tile and i thought that the curved tub itself would have a nice gradient. then tako decided to jump into the action, and that's about it. just one light, in an sb-3 pointed at the ceiling.

setup shot:

day 160 - open door


for this shot, i wanted to use an open door as a graphic element, with a softened flash creating a gradient on one of the walls back in there. so i set up a softbox camera left, put a flash on the stairs, and that's it.

setup shot:

Friday, October 30, 2009

day 159 - stealing from dc


dean collins was a photographer in the '80s who made a series of videos demonstrating his lighting techniques. the guy was phenomenal. he did it all.... jewelry, portraits, outside stuff, inside stuff, motorcycles, cyc walls.... everything. his videos should be required viewing for anyone interested in lighting technique.

one of the techniques he used from time to time was using a mirror with a colored gel taped to it to color in his backgrounds. this was the '80s, so brightly colored neon-ish background were all the rage. but it's easy to tone it down a bit and make things more subdued and contemporary.

so i used that move here.... i took alisia's concave beauty mirror, and taped a variety of cto gels to it, then aimed a flash at it and angled it to project the light onto the background of my shot. it's a great technique to use because the light has to go through the gel, bounce off the mirror, then go through the gels again, so the light gets filtered / colored twice. it's effectively doubling up the number of gels you're using, which results in a more intense color than you'd otherwise get.

not much else to this shot. beauty dish high camera right, white reflector under the chin, crazy eyed look, and it's done.

setup shot:


mirror shot:

day 158 - red and multiply


this is a pretty typical setup.... the difference being that in photoshop i doubled up the layers, ran the top one through silver efx, then set it's blending mode to multiply so that it adds an interesting layer of contrast to the scene. makes everything that much more dark and harsh.

for the red background.... i used the colorsplash flash set to red, with another red gel taped over it. it was too bright at this fstop (f 1.8), so i wrapped the whole thing in a plastic bag which both diffused it a bit and darkened it up a bit. mission accomplished.

setup shot:

Thursday, October 29, 2009

day 157 - window blind background


the idea for today was to use the early morning light coming in through our closed window blinds as an out of focus background. so i set up my 35mm lens at f1.8 for maximum blind out-of-focusness, the beauty dish for main, and the sb-3 camera left and behind for separation / rim. used a 32" white reflector for a bit of added softness, and there it is.

i like how it came out. and since the blinds are lit both from the flashes and from the light coming through from outside, it's easy to control via shutter speed. you want the background brighter, you leave the shutter open longer. you want it darker, you close it up faster. i think the winning number turned out to be 1/80th of a second.

and it's as easy as that.

setup shot:

day 156 - joeyl's multiply effect


i have this old photoshop tutorial by a guy named joeyl who is quite the well known photographer. anyways. in the tutorial he shows how he uses the multiply layer blending mode to get really vibrant tonal regions with a desaturated look. so i gave it a shot.

i think i went a bit heavy handed, as i tend to do, but it's not bad. might be better for a street portrait type image. one with ambient light in the mix.

setup shot:

day 155 - around the house


figured i'd do some wide aperture shallow dof stuff around the house.... these are all lit by an sb-28 @ 1/64th into an sb-3.

Wednesday, October 28, 2009

day 154 - dish from above


man, that's a goofy smile. but hey, you get tired of seeing picture after picture of yourself scowling. sometimes you gotta mix it up and try a new expression on for size.

anyways. this idea was take my fake ring flash concept, and move it up slightly overhead. angle the whole mess (flash, dish, camera) down at the subject, and fire away. it's not a bad result. the "ring flash look" is lessened, which is a bit of a good thing, and the new angle is pleasing. my focus is a bit off.... more on the tip of my nose than on my eyes, but that's what happens when you're on a tripod.

so yeah. not bad. not great, but not bad.

setup shot:

Monday, October 26, 2009

day 150 - climbing the mountain


right now i have 5,068 pictures on my hard drive that i've taken for this 365 project. i'm not even halfway through (day 187 will be that mark) and i've got over 5k on the hard drive. it's taking up almost 60 gigabytes of space. it's almost time to buy a new hard drive specifically for this project.

it's becoming a bit different of a thing to do this project every day. i'm less pumped up about it, less thrilled to try new things..... feels more like i'm grinding away at it right now. making small but steady improvements, not big leaps of insight or understanding. it's more about refining things at this point. i'm still excited about it. i still think it might be the best idea i've ever had, it's just lost a bit of that thrill of exploration feel it had. the newness is gone, now i'm slowly categorizing every detail of everything i've discovered for future visits and return trips.

and i am discovering things that i still want to experiment with. it's not a lessening of the thing. i think it's kinda like a relationship. over time the infatuation period fades, but things get deeper. things feel deeper, more rewarding these days. i feel like i'm crafting images more and more, and blindly experimenting less and less.

setup shot:

day 149 - glasses and a dish


for this one i set up my beauty dish horizontally, as you can see right there in the glasses reflection. that was my fill light. for my main, i had an sb-28 pointed at the ceiling, away from the background with a cto gel on it. then when i adjust for the cto gel, the ungelled dish goes a bit blue, and everything looks that much cooler.

setup shot:

day 148 - small softbox


the other day alisia and i were at a restaurant, and i saw this young girl across the room check her iphone... and in the dimly lit warm ambiance her face was lit up with a bluish light from the phone. i thought it was an interesting scene, with a pleasant color contrast, and i wished i had my camera with me at the time.

but i didn't. so instead i did something similar here. this picture is no flash, wide open aperture and a longer shutter speed. even with all that, it was underexposed, so i bumped my iso up to 400. my d60 gets really noisy at 400, so i ran this image through imagenomics portraiture lightroom plugin after lightening it up in lightroom. it did a pretty great job of smoothing things out without making my skin look plastic, and this is the result.

other info:
Model: NIKON D60
ISO: 400
Exposure: 1/15 sec
Aperture: 1.8
Focal Length: 35mm
Flash Used: No

setup shot:

Sunday, October 25, 2009

day 147 - color contrast twist


for this one i thought i'd get back to doing the old color contrast thing. so we have the beauty dish with an ungelled flash, and a lone sb-28 with a 1/2 cto bouncing off the floor (the hardwood warms it up even more) to provide the color twist.

i wanted it more dramatic/dynamic, so i used lightroom's "graduated filter" tool to push even more orange to the left side, and even more blue to the top right side of the image. i like the results.

setup shot:

day 146 - flat solid light


this is an example of that big flat light that a lot of photographers like to use to show gritty drama in the faces of ordinary people. the only real trick to the lighting setup is to make it as close to on-axis as you can.... in this case i did my fake ring flash trick, put the camera in front of my beauty dish for that shadowless feel, and fired away.

the real secret is in the post production. for this one i used lightroom, and made really solid black areas, then turned up the "exposure" knob until it was just shy of losing detail. played with the contrast and brightness until it looks right, and you're done.

by the way, that reminds me of something.... in lightroom, you typically use "exposure" to set your white point, the amount of the picture that is 100% white. then you use "brightness" to adjust the values of your midtones, and "fill light" to control the amount of light in your dark tones. if all you're doing is adjusting the "exposure" slider (like i used to) then you're losing out on over half of the control you could have on your image.

sometimes i think any recent improvements in my photography skills all just have to do with getting better at lightroom.....

setup shot: