Saturday, October 17, 2009

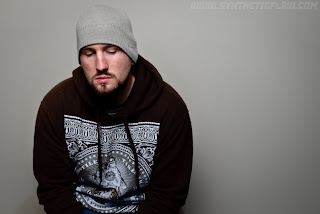
day 126 - front and back


this is a three light setup, a blue gelled light for the background, a cto gel for uplight, and a softbox camera right for main illumination of subject. it came out pretty well... i adjusted the colors a bit in lightroom, tried to make the balance more.... balanced. i like how the blue light on the background really pops the subject off, and separates things.

setup shot:

Friday, October 16, 2009

day 125 - down the couch


yeah, thought i'd use the couch as a framing device.... have the camera looking down it, and light the far end with a softbox on one side and some gelled hard light opposite. i liked it, pulled the trigger, and tako decided that she wanted to get in on it too. here's the result.

setup shot:

day 124 - i've got a bike


you can ride it if you like.....

this is just a bike outside at about 4pm, on an overcast day, with an sb-28 through a cto gel warming things up a bit. i was torn between going for a hard gelled light and using an umbrella to soften things up.... i wound up going with the hard, i thought it added interesting geometry via shadows and whatnot.

setup shot:


bonus shot w' shallow depth of field:

day 123 - half window light


today i wanted to try incorporating some window light into my image. so i opened the blinds for once, set up my softbox as a cross light, and started firing away. because this is a mix of flash and ambient light sources, you control your flash intensity with your aperture, and control your ambient light with your shutter speed. it took a few exposures to figure out the right settings, but it wasn't too hard. the numbers i wound up using were 1/4 second, at f5.6 (the largest aperture i could use at this zoom length).

it's an overcast day here in chicago, so the light coming in from outside added a nice bit of color contrast in addition to soft fill. at 1/4 second exposure, any movement you make will be picked up in the areas lit by ambient light. i tried to hold still, but there's still a bit of blurriness on the camera left side.

anyways. not a bad picture.... oh, and by the way, this is day 123.... that means i'm officially more than 1/3rd the way through the 365. it's a milestone, sortof. won't be long now till this project is over and i have to find a new one.

setup shot:

day 122 - big soft with couch


i'm a really lazy guy. if the softbox is set up, i won't even consider using anything else. i figure i'll just go with what's already there. it works here, i moved the softbox and the couch away from the wall to get the wall darker, set up a blue gelled strobe camera left for separation / color contrast, and fired away.

the image feels a little left-heavy, i probably should've lit the right side a bit more, but it's not that bad. and my hands look huge, which is cool.

setup shot:

Thursday, October 15, 2009

day 121 - new angle


i've never set up my softbox like this before.... high up and horizontal. i figured i'd do this up and see what results i get.

setup shot:

day 120 - looming plant


my goal is to become like an online poker player.

i think no one is ever born a natural at anything. any real skill requires time and effort to cultivate. i don't think of things in terms of talent, i think of things in terms of skills. if you practice something long enough, you'll develop a skill at it. the more you practice, the more skilled you become.

in the world of poker, there are great players. it takes time to become a great player, though. you have to play a lot of hands to get to the point where you know what to do with ace-ten six handed versus two handed. eventually you build up your skills to the point where you know what will happen if you play it this way, or that way. you've had enough experience (sat through enough hands) to build your skill to the point that you are a formidable poker player.

in the last few years there has been a number of very young poker players entering the scene who all play very very well. how, if they are so young, have they had the time to build up their skill?

it's because of online poker.

see, you can have as many games going simultaneously as you want in online poker. some people will play twenty or thirty poker games at the same time. it's not hard, since most of the time at the poker table you're sitting there waiting for someone else to figure out what they're going to do. if you're playing thirty games in the same amount of time as a traditional player plays one game, you're getting thirty times the amount of experience. you're testing different strategies, trying out ways of playing that might work and might not work. i'd say a year playing online poker that way is roughly equivalent to twenty years maybe of poker room playing experience.

anyways. there are photographers out there who have been shooting for thirty, forty years. they've used all kinds of equipment in all kinds of settings and come up with all kinds of lighting solutions. it's difficult to try and be a photographer without comparing your work to theirs.

but i'm hoping to create with this 365 project a situation like playing online poker.... i'm doing three or four photography setups a day, and i have been for the last six weeks or so. that's a lot of setups, that's a lot of experience. my work has definitely improved. i know my equipment better, and i know how to achieve different looks better. i can't tell how my work compares to people that have been doing this much longer than i have.... maybe they all went through times in which they did as many or more setups as i am.... but i'm definitely improving at an accelerated rate.

setup shot:

Wednesday, October 14, 2009

day 119 - shallow dof


one problem with using a shallow depth of field is that it's difficult to nail down what you want in focus. especially really close up, that depth of field gets really narrow. add to the mix the idea of autofocusing with the camera on a tripod and using a remote shutter control..... it's near impossible to get your focus correct.

but i tried anyways. at f1.8, on a tripod, with autofocus. it came out allright. i actually moved the camera far away from me, and then cropped in tight, that way my dof was wider, and i had a bit more leeway with what is in focus and what is not in focus.

setup shot:

day 118 - crazy sharp


yep, dig the new lens. spent maybe an hour outside taking wide open aperture pictures of any and everything. the autofocus is quick, man. quicker than the 18-55mm that came with my d60. it's fun to play with.

setup shot:


bonus tako shot to show off wide open aperture:

day 117 - the new hotness


just got my new lens. f1.8, with autofocus. now that is what i'm talking about. not the greatest picture, i was too excited to put it on the camera, didn't take the time to get a great shot.

setup shot:

day 116 - soft with floor bounce


our dark wood floors make bounced light go odd colors.

setup shot:

Tuesday, October 13, 2009

day 115 - double soft


first, i got to say that this setup is solid gold. seriously. look at that image. it has so many contrast points.... my right arm is light against the dark corner back there, and my left side is dark against the light wall. it's like the maximum amount of dark on light light on dark possible. solid. gold.

okay, my idea here was that i wanted two really large, soft light sources, one on either side of me. i only have one super big softbox, so i figured i'd set that one up on one side, and for the other side bounce some light off a wall. i've been playing with different compositions lately, so i figured i'd show a big chunk of the lit up wall, and have that corner back behind me.

there was only one problem that i encountered with this setup.... at first i wasn't gobo-ing the flash that is set up to illuminate the wall, so i was catching some hard light on my face, which was throwing a strongly defined shadow behind me. i wanted the flash to light the wall first, and then have that bounce hit me. so i set up a gobo to prevent direct light from hitting me, and there it is. problem solved.

setup shot:

day 114 - workin the corner


i'm starting to shift my mental focus from just light the subject and ignore the background to more of a whats-the-background-got-that-i-can-use approach. so with that in mind, i moved a bookshelf and set up here in the corner of the room. i put a beauty dish high camera right, and an sb-3 low camera right with a blue gel, popped a few shots, and there it is.

i like the geometric angles made by the wall joints and ceiling. the lighting isn't all that amazing, but it's a good image overall.

setup shot:

Monday, October 12, 2009

day 113 - shifting goals


when i started this shot my thought was i wanted to set up a hard light camera left, have that hitting my cheek/ear, then have something blocking the light from hitting my chin/nose. then set up a reflector camera right to bounce back some soft light.

so my face would be hard light on the left, shadow area, soft light on the right.

it was that shadow separation area that i was most interested in. it seemed like a challenge. so i set up a flash camera left, and clamped a small book (the melancholy death of oyster boy, if you must know) to block errant light from hitting the front of my face. set up the reflector, and it all worked out pretty well.

there's something about having a nice mix of hard and soft light on the subject that i like a lot.

so, that done, i wanted to build up the background a bit. first i gobo'ed the flash to prevent a lot of errant light from going back there. that worked allright, but i was still getting a lot of room bounce from the main flash.

decided some color was a good idea. set up the colorsplash with a slave trigger, and i liked it. but i'm getting a little tired of the just-a-color-gradient on my background. so i started looking around the apartment for something that would cast some cool shadows. i tried a few things before i came across our collander. clamped that in front of the colorsplash flash like this:


and the rest is history.

setup shot:

day 112 - rug background


we have a rug with a pretty cool pattern woven into it. almost a modernist thing going on. i thought it'd make an interesting background.... but didn't want to hang it on the wall. so i put my camera on my boom, and laid underneath it and took this picture. i think it came out well.

setup shot:

day 111 - like hiroshi


this morning i was looking through hiroshi sugimoto's portfolio, and i was struck by how when he photographs the sea he often puts the horizon line exactly across the middle of the picture. which most people who know stuff about photography will tell you not to do. i was thinking about how bisecting the frame like that creates a graphic design component to the photograph that wouldn't otherwise be present, especially in this one, which i think became an album cover for u2.

so i thought i would borrow that idea for this picture.... instead of a horizon line i used the joint where my wall becomes ceiling, and i noticed a bit of reflected highlight on one side, so i put myself under it so it would make a sort of a halo effect. i have no idea what's reflecting up there, i just figured i'd take advantage of it. i kept this one a lot darker than i usually would.... i wanted it to be more about the wall and ceiling, and less about my presence.

setup shot:

day 110 - falling scarf


set up some lights, turn on a fan, toss a scarf in the air, and pull the trigger. it's photography gold, i say. i don't actually say that, by the way. it's just a random thought i had, figured i'd try it out. i chose this particular shot because it reminded me of some cephalopod you'd see waving appendages in the ocean or something.

the light pattern on the wall was a bit tricky.... i wanted to use a white shoot-through umbrella for the big relative size of light source it would give me, but it always has that hard edge where raw light spills past the edge of the umbrella fabric and hits the background.

so, to solve that, i double diffused it. set up the white shoot=through, and then affixed my lumiquest sb-3 to the flash behind the umbrella. so light comes out the flash, goes through the sb-3, then goes on into the umbrella. lost some light doing that, but it created the double shadow/diagonal light gradient across the background that you see there. i thought it was a cool effect, diagonal lines add a feeling of tension, and i dig that in this image.

setup shot:

Sunday, October 11, 2009

day 109 - leaning in


this shot is a hardish light source, with a diffusion panel under my face to bounce some of that hardness back up soft-style. add a strobe camera left with a cto gel, and a stobe camera right with a blue/green gel for some color contrast, and that's about it.

setup shot:

day 108 - split toned madness


for this one i was trying for a different look using the same equipment as i did on day 107.... so instead of using the sb-3 as a rim/slash light, i use it here as a camera right main. the silver umbrella still provides dark side lighting, and now the trigrip diffuser is doing more fill than it did last time. i was hoping for a hard/soft tension, but it didn't really emerge.

got bored with the lightroom post processing, so i split toned it. i'm not all that big a fan of the split toning, but i thought i'd play with it anyways.

setup shot:

day 107 - 50mm portrait


today i wanted to try and make a portrait in the studio (living room) with my 50 mm manual focus lens. so this is it. i think it came out well, i was able to get good focus on the eyes, some of her hair and the tip of her nose are out of focus, which is really interesting.

it's still frustrating, dealing with the manual focus. i've got my eye on a 35mm af-s prime lens that will let me autofocus, so i'll probably pick that up this next week, add that to the arsenal.

so yeah. calling this one a success. having a gorgeous model to photograph doesn't hurt.

setup shot: