Saturday, October 10, 2009

day 106 - reflection management


the problem with taking a picture of a highly reflective object is that any light you put on it is just going to bounce back off. the more reflective it is, the more of a problem this is going to be. the solution is that instead of trying to light the object, you instead light the room around the object.

this flask is just brushed metal, so it's not all that difficult to deal with. however, you have to decide what it is you want to do..... do you want to play up it's reflective qualities, or show off the texture more? for this picture i decided i wanted a bit of both.

with reflective objects (like all objects) the size of your light source determines how the light is going to be bounced back into your camera. large light sources bounce light back in a very diffused manner, so you get a lot of the texture qualities in the image. small hard light sources bounce light back more intensely, so you get a lot more of the reflective qualities of the object.

for this flask's reflective qualities, i wanted smallish light sources hitting it directly. so i set up a strobe far camera right, and a strobe far camera left with a silver reflective umbrella on it. this was the result:


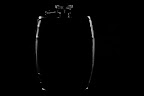
that defines the reflective qualities of the flask. it doesn't tell us much about the surface of the metal, though. to show the texture qualities, you need a large light source. in this case i decided on two big pieces of white posterboard used as reflectors, one on either side of the camera. the result:


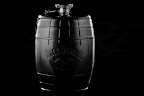
notice that it's showing you what's in the room.... that black shadow area in the middle of the flask is the gap between the posterboards where my camera is sitting. if i wanted to get rid of that shadow, i would push the two posterboards together so they're touching and cut a small hole at the joint to take pictures through. there'll likely still be a shadow area, but it'll be a lot smaller and more manageable.

i decide not to do that, instead i want to change the angle.... the flask isn't very dynamic in my current setup, i want more tension, suspense, maybe mysteriousness in the shot. so i pull back some to bring in more black area around the flask, and go higher for a (to my mind) more interesting vantage point. notice that you can still see that shadow area, but now it's close to the side of the flask instead of dead center like it was. it's much more tolerable like this.

so yeah, lighting the room... this is why car photographers always have giant swaths of white translucent silk, because a shiny car will show you everything that's in that room... good bad and ugly.
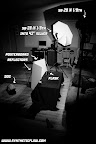
setup shot:

day 105 - diy softbox


yep, cheesy, i know. a literal frame within my frame. but whatever. i think it lends an interesting graphical element to the image. i've seen wedding photographers do this sort of thing, get some ornate frame, paint it gold, then have wedding guests hold it in front of them and pose behind it. gives 'em something to do with their hands, i guess.

anyways. the idea for this post is this:


that's a lampshade from a lamp we have in our living room. i clamped it to a light stand horizontally, put a flash behind it and then draped some white fabric over the front (i used a diffusion screen from my big softbox) and something opaque over the top (reflector skin for trigrip diffuser), and bam. homemade softbox.

it worked pretty well, i think. good soft light, not too big of a light source. not very moveable.... it took two lightstands to make it work, so that was a bit awkward to adjust or move at all. but the picture results are quite nice.

it's weird how most lighting equipment can be built out of spare or random things around the house.... when you buy "professional equipment" you're really just paying for ease of use and portability.

setup shot:

day 104 - frame within a frame


today alisia and i (and tako) went for an impromptu photowalk after getting bagels for breakfast. we passed under the L, and found this cool old concrete set of arches. so i had alisia and tako run out into the middle of the street and pose in the center of an arch for a "frame within a frame" composition.

all i had was my 50mm lens, but at this distance it was pretty easy to get solid focus. all the available light was nice and soft since we were under the overpass, and of course tako is a natural in front of the camera.

bonus picure of two bearded dragons in a pet store window:

Friday, October 9, 2009

day 103 - vanity funhouse


my girlfriend has this vanity mirror thing, it's one of those that has a regular mirror on one side, and a concave mirror on the other. so i figured i might get some sweet distortions if i shoot into it. so i set it up, and played around with it. i quite like the results. the picture has a sort of a drifting focus to it.... not quite like a tilt shift lens, not quite like a purposefully out of focus shot, kinda like a funhouse mirror, but very subtle.

i had to go with manual focus on this one, since autofocus would've wanted to take pictures of the surface of the mirror, and not what the mirror's reflecting. to make my manual pre-focusing easier, i tightened up on the aperture to f9.0 at 1/160th of a second. worked out allright.

the setup shot is for a variation i did after i did the closeups.... i wanted more distortion, so i positioned the camera and mirror on one side of the room, and my lights and myself on the other. hence the extra wide double-setup shot, and the obvious differences between the picture up there and the setup shot down there.

setup shot:

results of setup shot:

day 102 - staring at the sun


this was initially an accident. i had a blue-gelled sb-28 at full power behind my head to do that rim light thing. then in one picture i accidentally let the flash go directly into the lens, saw the results and made an executive decision right then and there that i should embrace this mistake and pretend that it was my intention all along.

but i got to write something, so then i went and wrote all about it.

my first idea for this picture was to play the "what else can i do with this stuff" game. it's where i've got a bunch of things set up already, and i have to switch it all up and see what other configurations i can come up with using only that same equipment.

so this is another look using only the stuff from day 100. i like how it came out. the beauty dish on the floor is doing very little, but the sb-3 is revealing my face nicely, i thought. it's doing it's usual hardish soft light magic.

setup shot:

day 101 - rainy flowers


yeah, i just get such a kick out of my 50mm lens..... even without autofocus, it's still so much fun to play with. so it was drizzling earlier today, i went outside and took some picture of our neighbor's flowers. it's late in the season, so they're starting to show wear and tear, but that's part of what i found appealing about them..... beauty and decay. like a picture of a quickly aging supermodel. you can see what was, and what's disappearing little by little every day.

day 100 - beauty dish


yep, so i wanted to use my home made beauty dish again today, so i set up this shot. i was at first working a two light sources in front angle, beauty dish camera right, and sb-3 camera left, but decided after a few shots that the single light source on the face would be more interesting. so the sb-3 got demoted to a camera right rim/slash light, and the beauty dish went it alone.

i dig how this came out. good light on my face, good quick falloff, good rear rim/slash lights.

setup shot:

Thursday, October 8, 2009

day 99 - double diffusers


i'm really digging these diffusion panels i got.... the 40" one was only 40 dollars, and the trigrip (totally superior product) was 130. i got them for outside midday stuff, and to use as reflectors, but i've been using them all over the place.... they're just so handy.

setup shot:

day 98 - chinstrap


so, i was thinking that i have in the past set up two from behind hard light sources that come over the shoulder and "edge" out both sides of the face. you mix that with a soft light source (either reflective, or an umbrella / softbox) and you get a very nice effect. for today i wanted to do something similar, but have the light be connected at the bottom.... making sortof a U of light around my face/jaw. a chinstrap, if you will.

so, setting up the sidelights... not hard. took about 30 seconds. for the under part, it was a bit trickier. i set an sb-28 on the floor, pointed up at my chest, and then rubberbanded a couple of pieces of notebook paper around it as a gobo. i was worried that too much light would hit my (otherwise not-very-illuminated) face from that unflattering up angle. so i wrapped the paper around it, and made sure when i sat down i couldn't see the flash head from where my head was.

so, most of the flash on the ground is going up into my chest. this would have been a problem if i was wearing a white or light colored shirt, but as the case happened to be, dark blue tshirt for the win.

then i set up a reflector camera left to throw some light on my face.... it's no fun if it's completely in shadow, after all. i like it. it's like hard light all around, little island of soft light in the middle.

the setup shot shows a golden reflector bouncing light back into my face, that's something i experimented with towards the end, when i put on my hood and wanted an evil monk type look. but this shot was using just a silver/white reflector, not gold.

setup shot:

day 97 - big up small down


usually i rock a large main light source, and a small secondary / uplight. with this one i decided to go opposite, and have my main light smaller, and my uplight the large one. it worked out well. because my face is so far from the uplight, and so close to the main, it's almost not-noticeable.

one thing i didn't mention in the setup shot is that the uplight has a slight blue gel on it. oh, and i've started doing this thing where i plug my camera into the tv so that everytime i take a picture i can see it on the tv right away, instead of having to get up, walk around to the back of the camera, and push a button to see if my head got cut off or not. so that's really helpful.

oh, and i wanted to try a texture on this one, so i dropped that spill up on there. seems a bit cheesy, but i wanted to try it and see if it was something i was into. maybe in the right setting / with the right subject, it could be cool. but not so much here.

setup shot:

Wednesday, October 7, 2009

day 96 - sandwiched in


had this idea while i was watching this week's "sons of anarchy", and i had to stop everything (loves me some tivo) set this shot up and take a few pictures. but it was totally worth it. i love this setup. i even love the raw light spilling past the diffuser onto my arm and shoulder. i feel like this is a surefire setup. guaranteed to make good pictures.

setup shot:

day 95 - on white


so i thought i'd work on my white seamless kungfu, even though i still haven't gotten around to ordering any white seamless. so this is me in front of my wall. i'm not completely happy with it, but it's a start. having a low-ish ceiling and off-white walls didn't help me much. i think this is going to be one of those things i have to practice on.

setup shot:

day 94 - reflecto


so i wanted a picture of me wearing sunglasses, and reflected in the sunglasses is some crazy scene. a skyline, or mountain range or something. the easy way to do this is take a picture of the sunglasses, and then mask out the lenses, drop in your reflection image in photoshop, and call it a day.

i didn't do that. instead i set up my tv to show a skyline, set up two flashes to illuminate me, and fired away. some problems encountered were:

1. i had to keep the shutter open longer than usual (1 second) in order to burn in the tv image.
2. the window blinds were letting in too much light from outside. had to cover them up.
3. long shutter exposure = have to sit very very still.
4. the light from the tv was illuminating the whole room.... had to burn it down in ps.
5. reflection in glasses still not as big as i would've wanted.

that's about it. used the silver reflective umbrella to control light leaks into the rest of the room, and the lumiquest sb-3 to create a hardish-soft light source camera right.

setup shot:

Tuesday, October 6, 2009

day 93 - getting the band back together


honestly, this was way more trouble than i thought it would be. it probably took me a half hour to set up the lighting, and an hour in photoshop to get in there and mask everything out so it looks seamless.

that said, it looks pretty good, i think. definitely makes you do a bit of a double take. i'm actually in there four times.... there's another me sleeping next to tako, but singing me is blocking the view of sleeping me.

i know this is just opening the door for a lot of "why are you always playing with yourself, tim?" type innuendo, but i don't care.

i wanted to try this because i have a band photoshoot coming up in a month or so, and i wanted to see if this was a good idea.... shoot everyone separately, then collage together a piece that has the best picture of each of them individually.

it's a good idea, and i think it would definitely yield superior results to just get everyone together and try to catch a moment where they all look good...... but i wouldn't want to do it like this, where everyone's close to each other. it'd be a much easier photoshop job if there was more room in between the different members of the band.

that's it.

setup shot:

day 92 - water glass


i really struggled with this one. usually i shoot with the largest possible aperture.... for my standard lens it's somewhere around f3.5 this gives me a nice shortish depth of field, so i can separate myself from the background and draw the viewer's attention right to me (the eye abhors a lack of focus, and will go straight to the part of the picture that is in focus). so i set up this glass of water shot the way i always do. and no matter what i did, i could not get it to get me in focus. i tried manually focusing on a tripod standin, i tried shining a light on my face for the autofocus, i tried everything. couldn't get an in focus shot to save my life.

so i gave up on it for awhile. thought about it a bit, then came back and tried again with a much smaller aperture. took it down to f11 to stretch out the depth of field a bit, and that did the trick.

one other thing you have to do when you close up the aperture is turn up the power on all the flashes you're using. after shooting 30 frames or so i think my batteries are about dead. oh well. a couple of hours on the charger and they'll be good as new.

setup shot:

day 91 - these sinning hands


yeah, the blog post title is an iron & wine reference. so sue me.

anyways. after yesterday i wanted more of that sweet sweet 50 mm loving, so i set up a light and my camera and took some pictures of my hands. i started out with a flash high camera right at 1/64th with the sb-3.... but it was way too bright at this aperture (f1.8).... how crazy is that? the flash is too bright at it's lowest setting from like three feet away. so i decided to bounce the flash off the ceiling for a super large light source and some distance to lessen the light a bit.

i think it came out decent. always unhappy with my lack of autofocus, but i do what i can.

setup shot:

Monday, October 5, 2009

day 90 - outside with the 50mm


yeah, i was outside watching the dog play in the yard as evening approached, and i decided to grab my camera and 50 millimeter lens and fire up some wide open aperture / short depth of field stuff. so i did. it was a lot of fun.

i don't use my 50mm all that much, because on my low-end dslr it only works as a manual focus, so i almost always wind up frustrated with pictures that are close to being in focus, but not quite there. my solution to the focus issue here is to take pictures of things where it looks like i was intending to have most of it out of focus. it usually works pretty well.

so yeah. this is all stuff in the backyard. no flash, no light modifiers, just me and my camera as evening encroached. i think it looks pretty good.

day 89 - high key


i cropped this one a bit differently than i usually do. most of the time i'm a 4x6 man, but for this shot there were some odd elements i couldn't eliminate and stay in a 4x6. it was nice that tako decided to pose for this one.

for this one i was determined not to have the same problem i did last time i did a high-key portrait. namely i had too much light going into the background, and it was eating away at the edges of the subject. so for this one i set up one sb-28 for the background, and started it out at 1/64th, then jumped it up one stop at a time until it looked right in the back of the camera. it's still a bit short of true white-with-no-detail, but i like where it's at right now.

setup shot:

day 88 - 100 feet tall


simple setup here. just a silver umbrella high camera right, the sb-3 w' cto gel low camera right, and a lone sb-28 distant camera left w' a blue gel.

the color contrast element really appeals to me. the more i execute it the more i wonder if i'm settling into some kind of personal style, either temporary or permanent.

i'm here on day 88. i've shot 2188 pictures for this project so far. i'm 24% through this project right now. i think my style and competence level has already evolved dramatically. it's strange, but i'm getting to the point where i can almost predict what the light is going to do. like i set up things this way, it's going to look like this, add this element here, and there it is. it's weird.

setup shot:

day 87 - lit like a strip club


for this one i wanted a really strong color contrast on me, but little color contrast on the background. it seems like if you want to keep light off the background, you have to stay away from the shoot through umbrellas.... they just throw too much light around. so for this one i went with a silver reflective umbrella and my lumiquest sb-3 softbox.

the silver umbrella had two cuts of blue gels, and my sb-3 had a cto gel on it. i also set up a reflector camera right, thinking it would add a bit of warm light to the cool light area, but i'm not sure it did anything.

setup shot:

day 86 - crazy smile


this picture comes from earlier today when alisia said that i make the same expression in all of my pictures. so this is a different expression.

setup shot:

Sunday, October 4, 2009

day 85 - outside diffuser


wanted to try out my diffuser in the backyard. i didn't have enough room to throw the tree behind me out of focus like i would've wanted, but it is interesting that it's all soft light on me, and hard light on the tree back there. this isn't my usual style... i prefer to make the subject brighter than the background, and not the other way around, but if i could find a dark colored wall or shadowy garage interior, this could be an effective direct sunlight modifier style.

setup shot:

day 84 - couch bounce


for this one i sat on the couch, set up an umbrella and a reflector, put a flash behind the couch pointed at the wall (zoomed in for a tighter gradient) and pulled the trigger. i like that my eyes are lit more from below than from above. i think it adds a subtle bit of ominous feelings to the mix.

setup shot:

day 83 - outside reflector


i wanted to do a diffusion thing with my trigrip diffuser outside. just stick it between me and the sun, and see what happens. but when i went out there the sun was behind some clouds and a tree. so instead i settled for some reflection.

hopefully the sun'll come out soon.

setup shot: